[url] 2023-08-26 13:07:22
PDF: [ link ] printable version A5.
28.11.2022Movement phase and terrains
Manoeuvring during a charge (added p52)
If the charging unit has enough space and all other rules of the charge is fullfilled - it can try to avoid terrains. Otherwise the charging unit has to do everything to make the charge effective or to capture the escaping unit, even if this would lead his charge movement through the passable terrain generating the Dangerous Terrain Test.
Redirecting the charge (exchange p.53)
If the target unit declares a Flee! reaction, the charging unit now has a choice: it can either attempt to complete the charge against the nowfleeing unit, or try to redirect its charge by making a Leadership test. If the test is failed, the charging unit must attempt to complete the charge against its original target. If the test is passed, however, the charging unit can declare a fresh charge against another viable target (the chargee may declare a charge reaction as normal). If there are no other suitable targets to charge, a charging unit cannot test to redirect.
Each unit can only make one redirect per turn.
Templates (add p.37)
To work out which models are hit, you normally need to hold the template over an enemy unit or a particular point on the battlefield, and then look underneath to see which models' bases lie partially or completely underneath the template.
All machines, spells and effects using templates are considered in this way.
Panic tests (exchange p.80)
In earlier sections I've hinted at the times a unit will be called on to take a Panic test, but now we're going to discuss it in detail. A Panic test is simply a Leadership test, as described on page 10. If the test is passed, everything is fine, but if the test is failed the unit will immediately flee as described opposite. Note that a unit only needs to take one Panic test in each phase (Movement, Magic, Shooting and Close Combat) even if there are multiple reasons to take Panic tests. Some Panic tests are taken immediately, and in larger games you'll find it helpful to mark units that have already taken Panic tests, in order that you don't end up mistakenly taking another as the phase goes on. If two or more units from the same army have to take Panic tests at the same time, the controlling player chooses the order in which tests are made. It's worth noting however that there are three circumstances under which even the most cowardly of units are not forced to take Panic tests.
* A unit does not take Panic tests if friendly causing unit has less US
* A unit does not take Panic tests if it is in close combat - the immediate fray blots out all other events going on around them.
* A unit does not take a Panic test if that unit is already fleeing - fear has already lent wings to these warriors, the prospect of further jeopardy does not accelerate their flight.
* Finally, remember that a unit does not take a Panic test if it has already passed one earlier in the phase - its nerve has been tested alread!
Heavy casualties
A unit must take a Panic test immediately if it loses 25% or more of the models with which it started the phase. This test will most commonly be taken as a result of shooting attacks or damage caused by enemy spells, but can also be triggered by other factors that cause casualties, such as miscasts, misfires, Dangerous Terrain tests or other special rules. Rather than having a series of very specific triggers for a Panic test, we use this as a 'catch-all' to cover units that suffer high casualties for any reason.
A Heavy Casualties Panic test must also be taken (immediately!) by a charging unit if its enemies Stand and Shoot and inflict 25% or more casualties. Where this happens, it can sometimes result in the charging unit panicking while it is still technically out of range of the enemy unit's missile weapons, which can look a little odd. Under these circumstances, we assume the charging unit to have been shot at as soon as it entered range, panicked and then fled out of range again - rather than make all of these individual moves, we let the abstraction save us time and complication.
Nearby friend annihilated
If a unit is destroyed for any reason, all friendly units within 6" must immediately test for panic. This covers situations such as when a unit is wiped out by missile fire, magic, close combat, pursuit or indeed any other occurrence. Obviously, it's best to leave the annihilated unit in place until the tests are taken in order to give a point to measure from.
Nearby friend breaks
If a unit breaks from close combat, all friendly units within 6" must immediately test for panic. Measure from the unit's position before it makes any flee move.
Fled through
A unit must immediately test for panic if fleeing friends move through it. For simplicity, resolve the movement of the fleeing friends before taking and resolving the Panic test. This is the most destructive form of panic, as one unit can panic and flee through another unit, which in turn might panic and flee through a further unit, and so on until your battleline is reduced to tatters.
Flee/Pursuit
Move Fleeing Troops (p74 - exchange - edited)
If the unit normally moves 6" or less roll 2D6. If the unit moves more than 6" roll 3D6. The result is the distance covered by the fleeing troops. All units flee directly away from causing unit/situation or directly to the nearest table edge when they failed Rallying Test. The fleeing unit does not avoid terrains, and even other units. When you run through a friendly unit (and the fleeing unit has more or equal US) then the friendly one must take panic test. When you run through a foe, then the fleeing unit must take a Dangerous Test. If you stop fleeing at the unit or impossible terrain just put the fleeing unit behind disturbed thing in the same direction.
A fleeing unit is destroyed if caught by pursuers, as described under Pursuit.
Subsequent Actions Of Fleeing Troops (p75 - exchange - edited)
If they are not destroyed then fleeing units continue to move 2D6" or 3D6" during their subsequent Movement phases. This is their Flee roll. They must attempt to leave the battlefield as quickly as possible, which often means that they will more towards the nearest table edge. This is a 'compulsory move' no fleeing troops are moved before other troops once charges have been declared (see the Movement section). All units flee directly to the nearest table edge (apply the Move Fleeing Troops rule). A unit which is fleeing cannot fight, shoot or use magic - it can only flee. If any models from a fleeing unit leave the table edge then the entire unit is considered to have left the battlefield and is removed from play. Troops have scattered beyond recovery or have found places to hide themselves until the battle is over. If enemy troops successfully charge a unit that is already fleeing then the unit automatically flees from the charge. The unit makes its 2D6" or 3D6" Flee roll just like any other unit fleeing from a charge. The charging enemy destroys the fleeing troops if it catches them. If they do not catch the fleeing troops then the charge has failed (see Movement for the rules relating to charges and charge reactions).
Pursuit Move (p75 - exchange - edited) Once fleeing troops have been moved, victorious units will pursue. To find out how far they pursue, starting with the unit with the highest Unit Strength, roll 2D6 or 3D6 in exactly the same may as for fleeing troops. This is their Pursuit roll. If a victorious unit scores equal to or greater than the Flee roll scored by the unit it is pursuing then the fleeing unit is completely destroyed - all the troops are cut down as they run or they are scattered beyond hope of regrouping. Pursuers are moved the full distance indicated straight towards the fleeing troops, and through their position if their pursuit move is especially long. If the pursuers do not roll a sufficently high score to catch the fleeing unit then no further casualties are caused and the pursuers are simply moved the distance indicated towards their fleeing enemies. Pursuers always move their full pursuit distance unless their pursuit takes them into contact with fresh enemy (see p.76) or they stop 1" apart from Impossible Terrain. During a pursuit move, remember about Dangerous Tests. Note that units do not continue to pursue in subsequent turns; pursuit is a single bonus move which is made when a beaten enemy flees. One unit can only pursue one fleeing enemy unit, even if it broke several units in close combat.
Pursuit Into Fresh Enemy (p76 - added)
Pursuers can pursuit into fresh enemy even when they do not caught the fleeing unit. (ex. When the fleeing unit, ran behind the impossible terrain).
Air And Ground Movement (flee, overrun and pursue) (p106 - added)
Flyers always move on the ground when attepmting to flee pursue, overrun - there simply is no time for them to take off properly. Note that they still benefit from their 3D6 distance as they flee overrun and pursue.
Aligning to the Enemy (p53 - exchanged)
Once the charging unit contacts the enemy unit, it must perform a second, bonus wheel if required to bring its front facing into flush contact with the facing of the enemy unit that has been charged, maximising the number of models in base contact on both sides. We refer to this as 'closing the door'.
Dangerous Terrain(x)
Some areas of terrain are increadibly treacherous and present very real risk to life and limb. When a model marches, charges, flees, overruns or pursues into or through an area of dangerous terrain, it is called upon to take a Dangerous Terrain test. Number in parentheses and any less score, means that model has suffered a terrible mishap and suffers a wound with no armour saves allowed.
A Chariot that fails a Dangerous Terrain Test suffers D6 Wounds instead of 1.
Flyers take Dangerous Terrain Test, only if they land at terrain, not when flying over. Flyers take Dangerous Terrain Test only when use flying move.
Terrain, Open Terrain, Difficult Terrain, Very Difficult Terrain, Impassable Terrain, Obstacle
(removed p.50 p.51)
Hills (exchange p.60)
Block line of sight.
If the majority of the models in the target unit is obscured from the shooting model's view by a hill, a Hard Cover Modifier applied.
Models on hill see like units with Large Target special rule.
Forest
A forest blocks line of sight. An unit inside the forest sees normally though it. In other words, the forest does not block the line of sight of the units that are located within the woodland terrain and outside it. It means that units inside the forest are treated as if they are in the open field, and therefore are seen by the models that are outside the forest.
If the majority of the models in the target unit is obscured from the shooting model's view by a forest, a Light Cover Modifier applied. It also includes a unit inside a forest.
A unit with the majority of its models fighting in a forest can therefore never be steadfast (unless it is Stubborn).
On the other hand, units of Skirmishers (and lone infrantry characters) are always Stubborn if the majority of their models is in a forest.
Cavalry has Dangerous Terrain (1)
Chariots and Flyers has Dangerous Terrain (4)
River, marshes and lakes
Does not block line of sight.
A unit with the majority of its models fighting in a river can therefore never be steadfast (unless it is Stubborn). Additionally, units even partially in a river cannot claim rank bonus.
Small Infantry (25mm) and Cavalry has Dangerous Terrain (2)
Chariots has Dangerous Terrain (4)
Obstacle
If a firer is shooting at a model that is behind an obstacle, the target model counts as having a Light Cover.
If you are charged the enemy who is attached to a cover at its frontage, then you have -1 to hit and lose all weapon bonuses for charging.
Cavalry has Dangerous Terrain (1)
Chariots has Dangerous Terrain (4)
Impossible Terrain
Block line of sight. Only a Fleeing Unit can move through Impossible Terrain.
If the majority of the models in the target unit is obscured from the shooting model's view by an Impossible Terrain, a Hard Cover Modifier applied.
Buildings are impossible terrains.
All fleeing units through the impossible terrain must take Dangerous Terrain (5)
Other unit
Block line of sight. Only a Fleeing Unit can move through other unit.
If the majority of the models in the target unit is obscured from the shooting model's view by an other unit friend or foe, a Hard Cover Modifier applied.
All units fleeing through enemy unit has Dangerous Terrain (3)
Close Combat and Shooting phase
General's Leadership (p102 - added)
Remember that a General with the Large Target rule (or who is riding a Large Target) has his general's leadership range increased to 18".
Challenge:
Issuing A Challenge (p99 - exchanged)
Challenges are issued at the start of the combat round, before any blows are struck (but after Impact Hits). Only one challenge can be issued per close combat - the side whose turn it is has the opportunity to issue a challenge first. If that side chooses not to, then the other side can issue
a challenge.
The player issuing the challenge nominates one of his character or champion models to issue the challenge. If he does not have a suitable model in the fight, a challenge cannot be issued. Similarly, if there are no characters or champions in the enemy units, a challenge cannot be issued — there's no one to fight!
If your opponent has issued a challenge, you can now accept it with one of your characters or champions whose unit is in base contact with the unit containing the issuer of the challenge. Note that a character does not have to be in base contact with an enemy to accept or issue a challenge, just part of a unit that is. The two models will now fight, as described in Fighting a Challenge, below.
Fighting A Challenge (p99 - exchanged)
If a character accepts the challenge, move him into base contact with the challenger — after all, what good is the narrative of a challenge without the visual reality? If, for whatever reason, this is not possible, assume that the two models are in base contact (this might require a little gumption to work out, so it's best to move the model if you can). These two characters must direct all of their attacks against each other — they cannot be attacked by any other model for that round of close combat.
If characters are riding monsters or steeds which have their own attacks then they fight during the challenge as well as their rider. If the character is riding in a chariot then the crew and creatures do not fight in the challanges at all (see chariot rules).
Remove Casualties (p70 - exchanged)
Casualties are removed from the rear rank, just like models killed by shooting attacks. Models that have stepped up to replace the fallen ones, can fight, provided that their Initative has not passed yet.
At the end of the Combat Phase, each unit that remains involved in the fight and is in contact with only one opponent's unit must get as many models as possible to fight while maintaining the shortest distance between the model final and its initial position. This manoeuvre applies to both sides involved in the fight. The player who won the combat has priority to make this move as the first.
Steadfast (only The Horde formation)
If a defeated unit has more ranks than its enemy and is in The Horde formation, it takes a Break test on its unmodified Leadership.
It should be noted that a unit does not lose its steadfast status for being charged from rear or flank by unit with US 5+.
Ranks count for steadfast rule cannot be canceled just like rank bonus for combat result.
Ex. Unit of 32 goblins (8x4 The Horde formation) is fighting with 12 halberdiers (4x3). Halberdiers charged greenskins at rear. They cancel goblins 3 rank bonus and little greenskins lose combat by -7 but they still can use Steadfast rule because they have 4 > 3 ranks... so now they can use unmodified LD for Break test.
Defend Obstacle (p69)
removed
Lapping round (p77)
removed
Expand Frontage (p77)
removed
Muliple targets (p267)
removed
Buildings (p129, p130)
removed
Flank and Rear Charges - Panic (p54)
removed
Moving Characters Within Engaged Unit (p97)
removed
Make Way! ( added )
Should a combined unit be fighting in close combat, it is only right and proper that a mighty hero will push his way through to the fighting. At the start of the combat (before Impact Hits are resolved), if a character's unit is in combat, but the character is not in base contact with the enemy, the controlling player can swap his position with another model that is in base contact. You can exchange him with rank-andfile model(s), including the command group, that are in base contact with the enemy. If there are one or more stranded characters on both sides, the players roll off and the winner decides which character makes his Make Way! first. Players then alternate choosing characters to do their Make Way! moves. Only characters whose footprint is compatible with the unit's rank and file can do this.
Making Way to Another Rank: Characters can use a Make Way! move in order to move to another rank - most commonly if their unit is charged in the flank or the rear. Once the unit is no longer in close combat, such characters automatically return to the front rank of their unit at the start of their following Movement phase.
Supporting Attacks (added p77 to Which models can fight)
Warriors in the second rank do not sit idly by whilst their comrades battle away, but muster forward to strike blows of their own. We refer to the attacks made by these models as supporting attacks.
A model can make supporting attack if it is directly behind a friendly model that is itself fighting an enemy in base contact, as shown in the first diagram on the right.
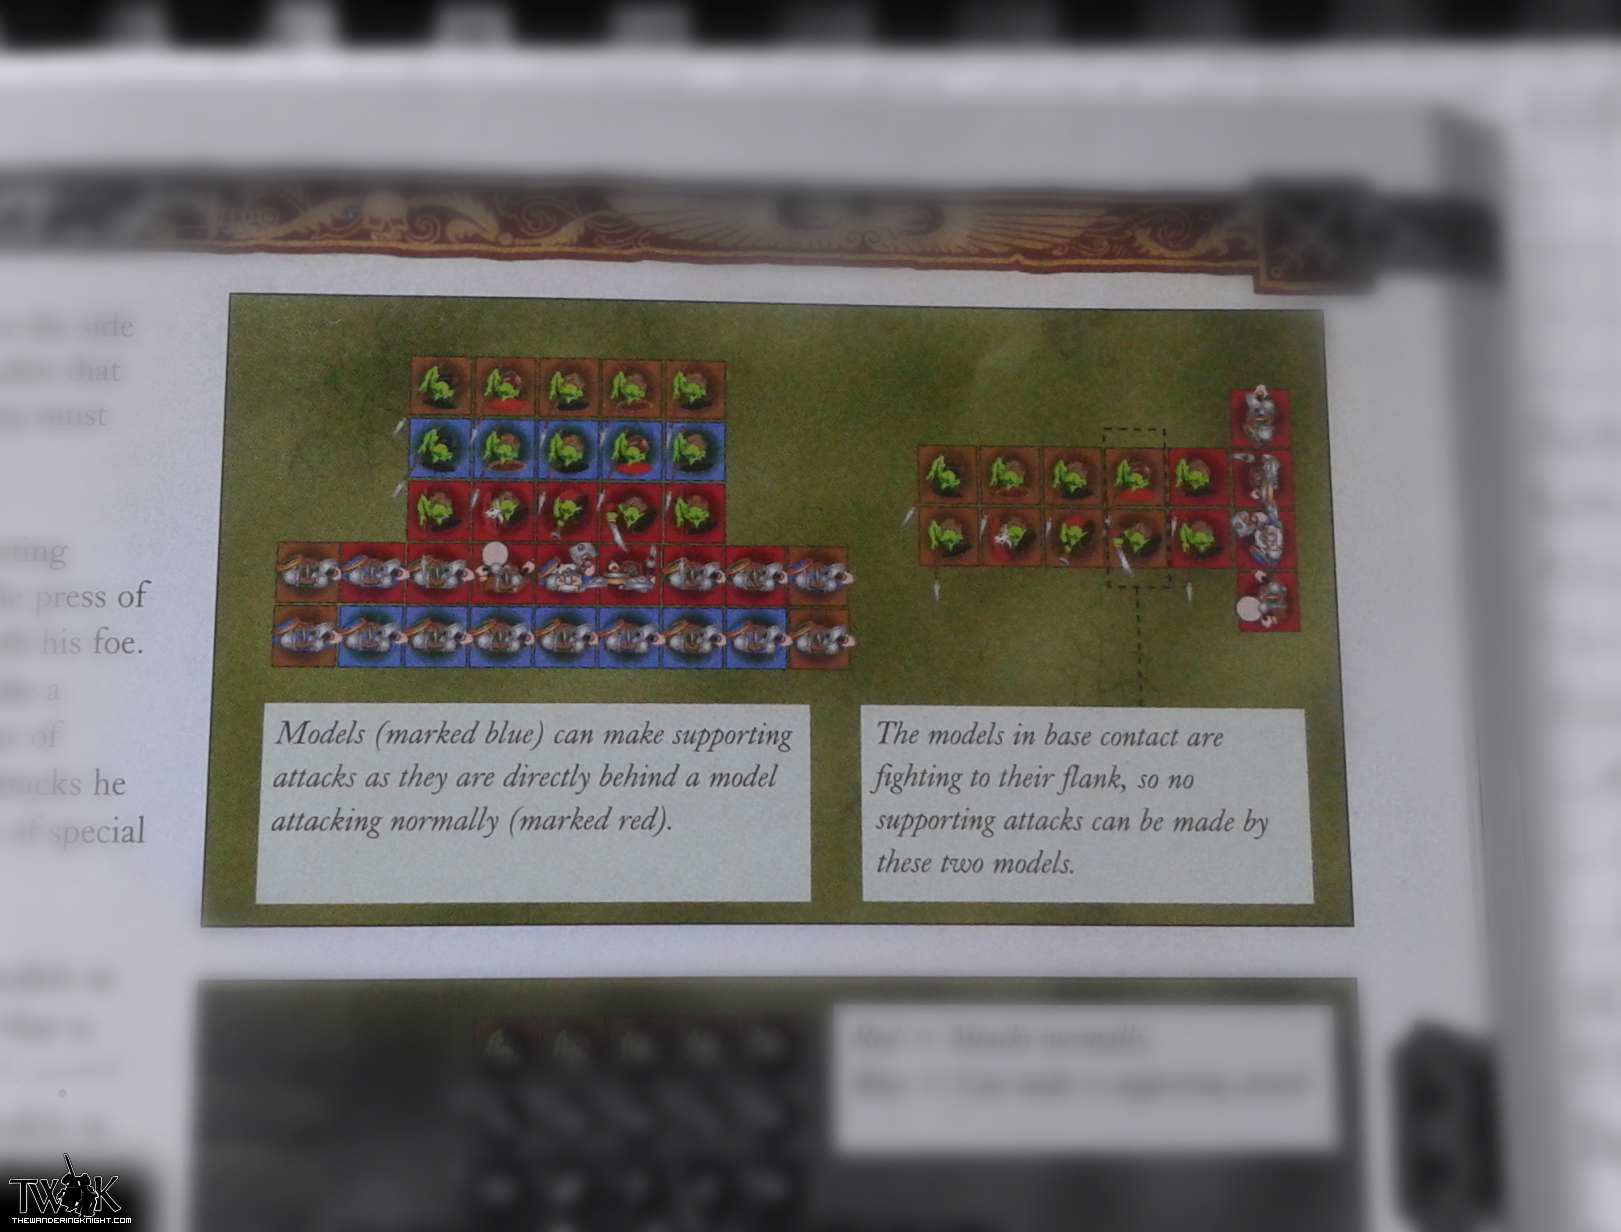
Supporting attacks cannot be made to the side or rear. Nor can they be made by models that are in base contact with enemies - they must fight the more immediate foe!
Of course, a warrior making a supporiting attack is rather more constricted by the press of bodies than one who is face to face with his foe. To represent this, he can only ever make a single Attack, regardless of the number of Attacks on his profile, or any bonus Attacks he might otherwise be entitled to because of special rules or other unusual effects.
Supporting attacks are made againt models in base contact with the front rank model that is being fought 'through'. If the front rank model is in base contact with two or more enemies with different profiles, the attacking player can choose which model to direct the supporting attack against (before dice are rolled).
Monsterous Support
A unit of monsterous models ( single model with US 3+ ) can make as many supporting attacks as are on its profile, up to a maximum of three, rather than the usual one supporting attack.
The Horde
Any unit that is at least 8 models wide is counted as being a horde. Warriors in a horde can make supporting attacks from the third rank, not just from the second!
This represents the crush of bodies driving yet more warriors into striking distance, as well as the back ranks surging forwards to assail the unengaged enemy warriors. If the unit drops below the minimum frontage, it ceases to be a horde and loses the ability to make these extra supporting attacks.
Monsterous Ranks
A rank of monsterous units ( single model with US 3+ ) needs only three models to count for rank bonus, steadfast and so on, and only six model in frontage to be counted as a horde.
Stomp / Thunder Stomp
A model with this special rule can make a Stomp in additional to its other close combat attacks. A Stomp has Always Strike Last special rule, and inflicts 1 automatic hit, at the model's Strenght, on enemy infratry, war beasts* or swarm unit in base contanct with the model. This represents the creature crushing the foe beneath its ponderous feet, or knocking their broken bodies aside with one sweep of its mighty tail (probably while it's roaring in a most intimidating fashion).
Thunderstomp
A Thunderstomp makes D6 hits on the target unit, rather than the single hit for a normal Stomp. It is otherwise treated exactly like a normal Stomp.
All models (without war machines and chariots) with US(3+) get
Stomp and models with US(5+) exchange normal Stomp to
Thunderstomp.
*war beasts - all (50x25 base models) with single characteristic on it (without Jezzails).
Some armies employ hunting animals, such as hounds or wolves. Whilst not particularly inteligent, such creatures can be formidable foes in close combat, and cover ground at an incredible rate.
Some characters can ride war beasts, in which case the model uses the rules for cavalry.
Weapons:
Hand Weapon + Shield (foot) (p88)
exchange Fighting with a hand weapon and a shield to Parry Save (fighting front, ward save 6+ cc only)
Second Hand Weapon (p88)
change in Fighting with a weapon in each hand , model get +1I and +1A instead of only +1A
Spear (foot) (p89)
exchange Fight in ranks to Fight in Extra Ranks(when do not move that turn and fighting front) and Killing Blow(cavalry only, when do not move that turn and fighting front, first round of combat)
Bows (p92)
add Volley Fire
COVER (exchange p.60)
If the majority of the models in the target unit (or, when firing against a single model, more than half of the target model) is obscured from the shooting model's view by other models (friend or enemy) or by terrain then an additional To Hit modifier is applied. This will be classed as either soft or hard cover — see right. It is common for some models in the firing unit to have something in the way, and for others to have a clear shot. Where this happens, simply resolve the two sets of shots (and thus the two sets of To Hit modifiers) separately.
Target Behind Soft Cover
Soft cover offers a little protection against missile fire, but its main advantage is to hide the target from view. If the majority of a unit is obscured by hedges, fences, wagons or other 'soft' terrain, it is said to be in soft cover. Soft cover inflicts a -1 shooting modifier.
Target Behind Hard Cover
Hard cover represents cover of a more durable kind, like that offered by stone walls, boulders, buildings and suchlike. We also count intervening units as hard cover (if they obscure the line of sight to the majority of the target, of course) as their presence will play havoc with the shooters' accuracy. If the majority of a unit is obscured by such 'hard' terrain, it is said to be Hard cover. Hard cover inflicts a -2 shooting modifier.
Note that the To Hit penalties for hard and soft cover do not stack — in a situation where a target would benefit from both soft and hard cover, simply apply a -2 shooting modifier for cover.
Volley Fire
A unit with this special rule can choose to Volley Fire instead of making a normal shooting attack.
If it does so, half the models in the third and any subsequent ranks, rounding up, are allowed to shoot (in additional to the usual firing models in the front and second ranks). Models in rear ranks can use the line of sight and front arc of the first rank model directly to their front for the purposes of Volley Fire.
A unit cannot Volley Fire if it moved earlier in the turn, or as a Stand and Shoot reaction.
Fighting in extra ranks (p89 exchange Fighting in ranks)
If a unit has this special rule then supporting attacks can be made by an extra rank than normal on a turn in which the unit did not charge. Accordingly, a unit with this special rule can normally make supporting attacks with two ranks. Remember that supporting attacks cannot be made to the side or rear, but only to the front.
A horde with this rule will make supporting attacks with three ranks.
Fire in two ranks
In simple terms this allows units to fire in two ranks.
Damage (p.121) delete first paragraph.
Stone Thrower Summary change (4) point to:
4) All models completely or partially under the template are hit automatically.
Regeneration (exchange p.113)
Some creatures, such as Trolls, are able to regenerate damage - their flesh immediately healing from the most serious of wounds.
This rule confers a special regfeneration save to the model which works exactly like 4+ ward save, with the following exceptions:
- Wounds suffered from flaming attack cannot be regenerated - no regeneration save is allowed against such attacks.
- Regeneration save are not ward saves, and can therefore be taken after armour saves and ward saves have been failed!
Breath Weapon (exchange p.114)
A model with a Breath Weapon can use it to make a special attack once per game. A model with two or more different Breath Weapons can use each one once. The form that this special attack takes depends on whether or not the creature is in close combat. In the event that a model has more than one Breath Weapon attack, it is permitted to use only one in a single turn.
Breath Weapon Shooting Attack
Provided the model is not in close combat, it can use its Breath Weapon during its Shooting phase. A Breath Weapon shooting attack can be made even if the model marched or reformed during the same turn. To perform the attack, place the flame template so that it lies entirely within the model's forward arc, with the narrow end touching the creature's mouth, and so that it is not touching any friendly units or enemy units that are in close combat. All models that he even partially under the template are automatically hit, as covered on page 9. The Strength and any special effects of the creature's Breath Weapon will be covered in its rules.
Breath Weapon Close Combat Attack
If the model with this special rule is in close combat, it can use the Breath Weapon to make an additional close combat attack at its own Initiative (in either player's turn). A model that makes a breath weapon attack in this way inflicts 2D6 automatic hits on a single enemy unit in base contact — if there is more than one enemy unit in base contact with the model, the controlling player chooses which enemy unit suffers the hits. As with breath weapon attacks made in the Shooting phase, the Strength and any special effects of the creature's Breath Weapon will be covered in its rules. Wounds caused by a Breath Weapon in close combat count towards combat resolution.

Nobody thinks it's important

Nobody thinks it's heresy

Nobody thinks it's solution

 Main Gaming Wisdom


 You must be logged with confirmed account to participate in the discussion.